martedì 18 agosto 2009

The Manga Cookbook


I purchased this book as a gift for my friend's daughter who is in love with all things manga and wants to learn to cook some Japanese food. It is called The Manga Cookbook by the Manga University Culinary Institute (if that actually exists) 158 pages and before I gave it to her, I'd figure I'd post some info about it here.
Honestly, I am tempted to keep it but since many of the recipes I already know quite well, I will not. There are a few tips which I did not know about so it was a pleasure to read.

The book is quite cute being presented in comic book form. The beginning pages have colored fotos and then the book becomes a comic paperback book format. Very effective.
There are recipes for preparing fruit and even how to hold and use chopsticks. They have even included a glossary at the beginning so you can understand the ingredients.
The recipe lists includes everything from setting the table, appetizers, and second course dishes like chicken Teriyaki and Yakitori. There is even a recipe and full explaination on how to make sweet bean paste, sushi and miso soup. There is also a section on how to make and pack two different bentos - with full info on how to cut the food to shapes to form a little train and a garden.
I was surprised to find an actual recipe and instructions on how to make your own Udon noodles.

I like the suggestion to put the dough in a baggy and "remove your shoes...and step on it softly for 15 minutes". Cute way of kneading noodle dough.

It makes lots of safety suggestions for young people learning how to use kitchen knives.
Overall the price is very much worth it. I picked it up on a discount from an Italian Internet book store but cover price is $14.95. As usual, on Amazon, it's discounted and you can actually check out the content of the book. It makes a nice gift for a young person who wants to try something new. And it's not so bad for someone older who thought they knew all the tricks.

mercoledì 5 agosto 2009

Medieval Food

My sister Karen bought me a book a while ago during one of our visits to a museum here in Florence. The book is by Christopher Hibbert and called The Rise and Fall of the House of Medici which can be found on Amazon for a decent price.

I have yet to finish the book since it is not quite as fun as many historical novels but it is interesting especially if you have been to Florence or know any Florentine vernacular. It is great fun to finally understand where alot of strange customs were born and why some survive today. It's like reading a "hidden Florence" book that explains so many cultural differences not just between Italians and non but between Florentines and non.

In any case, there is an excerpt about food that was amazing since today's Florentine cooking doesn't at all reflect the creativity that the Medicis enjoyed.

"...evening meal of garlic-flavoured pasta, ravioli in broth, liver sausage or black pudding, goat's milk cheese, fruit and wine, with occasional pigeon or a piece of meat, usually lamb, on a Sunday. For the richer merchants, of course, there was more exotic fare. Excessive indulgence was forbidden by sumptuary laws; but, as with clothes, the laws were flagrantly disregarding and the most was made of every loophole. If the main course was to consist of no more than "roast with pie", well then, everything that could possibly be desired was tossed into the pie, from pork and ham to eggs, dates and almonds. An honoured guest of a well-to-do citizen might be offered first of all a melon, then ravioli, tortellini or lasagne, then a berlingozzo, a cake made of flour, eggs and surgar, then a few slices of boiled capon, roast chicken and guinea fowl, followed by spiced veal, or pork jelly, thruses, tench, pike, eel or trout, boiled kid, pigeon, partridge, turtle-dove or peacock. For vegetables there was usually a choice of broad beans, onions, spinach, carrots, leeks, peas and beetroot. Finally there might be rice cooked in milk of almonds and served with sugar and honey, or pinocchiato, a pudding made out of pine kernals, or little jellies made of almond-milk, coloured with saffron and modelled in the shape of animals or human figres. Everything was strongly flavoured. A chicken minestra would be spiced with ginger and pounded almonds, as well as cinnamon and cloves, and sprinkled with cheese or even sugar. Into a fish pie would go olive oil, orange and lemon juice, pepper, salt, cloves, parsley, nutmegs, saffron, dates, raisins, powdered bay leaves and marjoram. The red sauce known as savore sanguino contained not only meat, wine, raisins, cinnamon and sandal, but also sumac which is now used only for tanning."

The amazing thing is that if you ask about many recipes, they have been lost through the ages.
I know of one book published by a chef who actually has a restaurant here and cooks renaissance and medieval florentine. It's called the Pentola D'Oro and his book is called the same although I think it would be difficult to find outside of Italy. I went there a long time ago and Chef Alessi served up tagliatelle al raffano - meaning pasta with horse-radish !! I had never even seen a horse-radish let alone think about using it in a pasta sauce. It was almost impossibile to eat. But really nice.

It's too bad that so much of this cooking has been lost on modern day florentines. I guess some things, like the Medici, where destined to die out.

lunedì 20 luglio 2009

New Bento Purchase


I would like to direct everyone to a new site which I found while facebooking. It is called bento and co and even tho the site is in French, it is worth a look through even if you don't understand French.

The products come from Japan. I was interested mostly because the prices are given in Euros (which is easier for me) and the transport costs are more than reasonable. For shipping to Europe, the usual insurance is suggested either using EMS or FEDEX. In the case of FEDEX, be careful as they will charge you extra for paying custom's and duty upon receipt of a package (it's considered a sort of COD or cash on delivery even tho it's a bit of a stretch in my book and technically stealing. But hey...)

Here is the bento I purchased.
It can be found under "les sets" and is really nice because so many colors are offered and co-ordinated with the little cotton bag and chop sticks in their case. The chop-sticks are really high quality - something most don't offer.

They also have some amazing little accessories like panda food sticks and bottles as well as unique food cups that can be re-used. The also have really nice onigiri containers - for putting your rice cakes in and keep them fresh.

What caught my eye though was the soup bento. I had been looking for a solution to keeping a portion of soup hot but not using a giant thermos or something. Well, I found it here and in a variety of colors. The nice thing is that it is quite compact and holds a serving of soup and is very very chic. It even has its own little folding spoon. The quality is excellent. No cheap or fragile plastic.

The site changes often since I had purchased not even a week ago my products (which arrived as promised within 4 days) and already I see new products up on the site. Some are very special made of bamboo and if I understand correctly especially for Bento&Co.

Prices can be quite high for the more crafted products but I have never really seen anything like them. Well worth the price I believe.

Browse the site and purchase as they are quite serious and the products really are lovely.
And to keep in theme, make sure you check out their face book page and their blog. They're full of recipes too.

martedì 7 aprile 2009

Easter Eggs

Ok, I know that decorating Easter eggs has nothing to do with bentos but since they are food and since this can be considered "beyond" normal food treatment, I might as well post this.
There are many ways of decorating eggs but I found that "Pysanky" or Ukrainian Easter eggs are probably the most fun and elaborate. The method is basically layering colors on top of colors and blotting out sections of the design using wax (usually beeswax) which has been heated with a candle. A small funnel shaped wax applicator is needed and can be found in most specialised crafts shops along with all the egg dye colors. Otherwise, you can purchase a ton of materials right on the internet.
The reasoning behind the egg decorating seems to be religious. The symbols used in most traditional Pysanky are based in the Christian faith. If you're interested in knowing more visit Learn Pysanky where they explain alot of the symbology as well as giving hints for making your eggs.

Step one would be to prepare your eggs and your colors. Since the colors should be cool before working, prepare them beforehand. I used mason jars since the opening is large enough to fit the egg (which should not be emptied yet) and a spoon to fish it out. The color preparation is clearly explained on the packets of color. Hot water and vinegar is needed.

Your eggs can be cleaned with a little vinegar to remove any marks or stamped dates. White eggs obviously work better.
Colors, egg, wax applicators and pencil

After choosing your design (books are available or go on the internet where designs are provided free), you pencil it out carefully.

Here I have penciled in the design and added wax over the areas I want to keep white. Meaning that the wax will now block the area from being dyed any color at all. I then dipped my egg in the yellow dye. Generally you work from lightest less intense colors to darker colors.

Here is the egg after dipping and drying and another egg penciled out and ready for dipping. Here I am working on some eggs.


And so on. Each time you apply wax you will maintain the color under the wax.
Green and blue....
and red...
And here is the egg with the varnish partially removed. There are a few ways you can do this since, if you remember, the egg has not been emptied yet and the last thing you want to do is break it while removing the wax. You can use oil based products (like cornoil heated up a bit) but traditionally it's just a small tea candle, tissues (without the softner in them) and patience. Do not place the egg directly over the candle as it will burst. Just heat the wax until it shines a bit and wipe off. You'll be amazed as the finish design emerges from the black wax.

The design finally can be seen !

Here are some eggs emptied and waiting their varnishing. Traditionally you're not supposed to empty the egg. They have a special meaning if they still have their innards. But to let them stay intact, you have to rotate your eggs everyday until the insides basically mummify. I have done it so it does work. I also put some eggs in the fridge and didn't touch them for a year and they stayed fine. No smell, no rotting. Otherwise, make a tiny opening at both ends with a needle, twirl the needle inside to break up the yolk, cover the end you're going to blow into with some plastic wrap (otherwise some of the dye may come off on your mouth!) and blow. Course, you can buy an egg blower too but that would remove alot of the fun.

Varnish your eggs with a high gloss varnish. A few coats will do. And let them dry well.

And that's it ! Ok, seems complicated but it isn't really. And the finally results are fantastic.


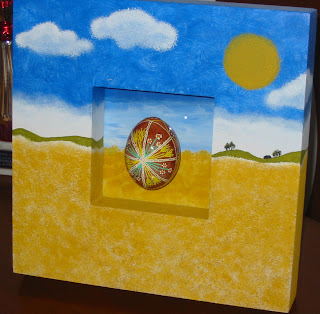
Here are the finished eggs. And here are some eggs which I presented in frames or in little environments.


Happy decorating.